Microneedling
What is Microneedling?
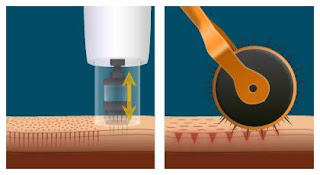
Microneedling is a procedure that has been around for a while and basically is the act of creating micro-wounds in the skin or channels which help activate your body's natural healing process. These wounds are not significant enough to damage your skin but enough to signal that your body needs to produce collagen and heal itself. Done properly, microneedling has a variety of benefits such as reducing fine lines, appearance of pores, scars, hyperpigmentation and even hair loss.
Risks of Microneedling
Since you are essentially inflicting damage on your skin, you run the risk of further damage and scarring to your skin. If the equipment or environment is not sanitized properly, you also run the risk of infection and complications that could result from it. You could end up with skin worse than the issue you were trying to fix.
I am sharing all this with you to make sure you do not take the decision to microneedle at home lightly. This procedure is done best by a trained medical professional in a sanitary environment and even then, the level of skill will determine how well the procedure goes and your skin will determine how many sessions you need.
Ok, so why did YOU do it at home??
At-Home Dermarolling and Dermastamp
Technique
This diagram shows how you can use the dermapen on your face. I avoided my nasio-labial folds and eye area because these are very sensitive. Intially, I also did not go back over areas because I was scared of damaging my skin too much. However, after a few sessions, I felt more comfortable going in this grid-like pattern.

After dermaneedling, my skin was red and tight but I did not bleed. Anything you apply afterwards gets absorbed much more effectively so please be careful what you apply. I prefer rosehip oil because my skin finds it very agreeable and it doesn't sting. Even hylaronic acid was unbearable post-needling, an ingredient I could normally tolerate very well.
I would also stop using tretinoin afterwards since my skin would typically peel 2-3 days afterwards. Nothing major but I could see dry skin sloughing off. My skin would be more sensitive and I couldn't even apply sunscreen so I would stay inside for the next couple of days and limit sun exposure.And I went slow...when I say slow, I would only do one session every month. This is because the skin renews on a 28 day cycle. Microneedling too much can actually prevent your skin from healing properly and can cause more damage. I did it consistently for three years before I could see marked improvement.
What have you learned?
Now, after 3 years of experience, I do some things slightly differently. I have gone down from 24 pins to 12 pin cartridges so that I could see more improvement. I also feel comfortable microneedling my crow's feet at .25 -.5 mm whereas I typically used to avoid that area entirely. I also go back over different areas, first round at a smaller depth and then deeper in areas which still have noticeable damage. I also added nano cartridges which basically felt like microdermabrasion and can be used daily.
In my opinion, there is no doubt that this method works. The research is out there and the results speak for themselves. The best case scenario is always to go to a professional. I am sure if I had been willing to pay for PRP or radio frequency, I would have seen results in half the time...at 10 times the cost. However, where I lacked in experience, I worked to make up in patience and research. I can never replicate the sanitized conditions of a doctor's office but I know my skin way better than a random technician and would rather go slow and steady. So please, if you decide to learn more and go in this direction, do your research and go slow. Each person's skin is unique and my journey will not be the same as yours. The more you learn, the better equipped you are!


Comments
Post a Comment